A guide to Java, Linux, and other Technology topics
Navigation
Project Tracking With Trackit
Introduction
TrackIt is an open source web-based project tracking tool, similar to Mercury Test Director or Alassian JIRA. Unlike JIRA and Test Director, TrackIt is free to use for any project. Trackit is built with the Echo2 Framework, taking full advantage of its AJAX based rendering engine. In this article we will provide a getting started tutorial guide for Trackit.
Downloading Trackit
TrackIt can be obtained in one of two versions, as a stand alone server application including an embedded web server (Jetty) and RDBMS (HSQL), or as a portal version, which is a war file ready to be deployed to any Servlet 2.3 specification compliant web container. For testing purposes, the stand alone version is the easiest to set up, however for production use, the TrackIt developers recommend using the portal version. To keep things simple, we will use the stand alone version for this guide. For complete installation instructions see the TrackIt Installation guide.
Installing Trackit
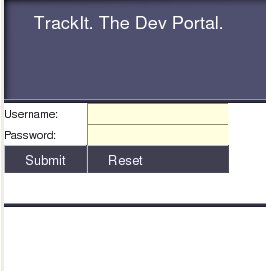
To install trackit, obtain the latest zip file from the TrackIt download page. Unzip the downloaded zip file into a new directory. To start TrackIt, there is a trackit.bat file that needs to be executed under Windows, and a trackit.sh file that needs to be executed under Linux and other Unix and Unix-Like operating systems. If you are working under Linux or other Unix-like operating system, the trackit.sh needs to be made executable, this can be achieved by typing "chmod 755 trackit.sh" on the command line. Since the embedded web server listens for connections on port 80, it needs to be executed as root. Once TrackIt is up and running, open a browser and type the following URL into the address bar: https://localhost/trackit. You should be greeted with a login screen similar to the following:
Creating a User
To create a new user, log in to TrackIt using admin as
both the user and the password. Click on the "admin" button at the top
right of the screen, then click on the "User Administration" button at
the top of the screen. Click on the "New" button on the resulting popup
window, you should be greeted with a screen like the following:
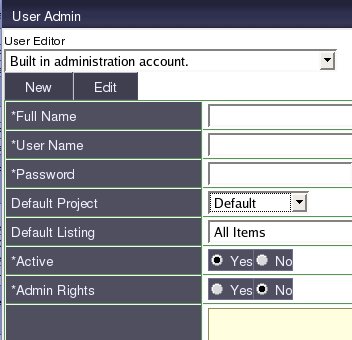
Enter the full name, user name and password for the new user, give him or her administrative rights and click on the "Save" button at the bottom of the screen. Close the user administration screen, log out and log in with the newly created user. TrackIt features optional CVS and Subversion integration, if you want to take advantage of this feature, the selected user name must match the user's CVS or Subversion user name.